
WordPress site တွေက Security ပိုင်းမှာတော့ တခြား CMS တစ်ချို့ထက်အားနည်းပေမဲ့ သေချာ ပြင်ဆင်ပေးရင်တော့ လုံခြုံပါတယ်။ အခုပြောပြပေးသွားမှာကတော့ WordPress ဘက်ကနေ ပြင်ဆင်ပေးရမဲ့ အချက်လေးတွေ သီးသန့်ပါပဲ။ တခြား Server ပိုင်းနဲ့ ကြားခံ Third Party Software တွေမသုံးတော့ပါဘူး။
- Update Theme & Plugnis
- SSL
- Change Login Url
- Change Username & Password
- Delete Inactive Accounts
- Insert Code in Function.php
- Insert Code in .htaccess
- Insert Code in Config.php
- Close Comment
- Other Useful Plugins
- Change PHP Version
Update Theme & Plugnis
WordPress Site တွေက အမြဲတမ်း Update ဖြစ်နေဖို့ လိုအပ်ပါတယ်။ ထည့်ထားတဲ့ Themes တွေ Plugins တွေက Update မဖြစ်နေရင်လဲ Security ကို ထိခိုက်နိုင်ပါတယ်။ ထို့ကြောင့် သင့် Website ကို တစ်လတစ်ခါ သို့မဟုတ် နှစ်ပတ်တစ်ခါ Update အမြဲလုပ်ပေးနေသင့်ပါတယ်။
မှတ်ချက် ( တချို့ Theme တွေက Plugins တွေရဲ့ Update Versions တွေနဲ့ အဆင်မပြေဖြစ်တက်ပါတယ်။ ထို့ကြောင့် update တင်ပြီးရင်တော့ ကိုယ့် site ရဲ့အခြေအနေကို ပြန်စစ်ဆေးသင့်ပါတယ်။ Site တစ်ခုလုံးနှင့် Database တို့ကို Backup ယူထားရပါမယ်။ )
SSL
Secure Socket Layer (SSL) က သင့် Website Traffic လမ်းကြောင်းတွေကို ပိုပြီးလုံခြုံစေပါတယ်။ ထို့ကြောင့် သင့် Website ကို SSL ထည့်ထားသင့်ပါတယ်။ Hosting ဘက်က SSL ထည့်ပြီးပြီ ဆိုရင် WordPress ဘက်က “Really Simple SSL” လို Plugin မျိုးထည့်ပြီး Active လုပ်လို့ရပါတယ်။
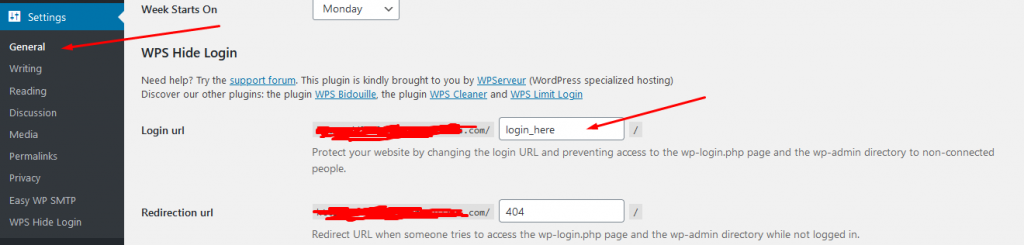
Change Login Url
WordPress ရဲ့ Admin Url က (yourdomain.com/wp-admin) နဲ့ Login Url က (yourdomain.com/wp-login.php) ဆိုတာ Developer တိုင်းနီးပါး သိနေတော့ ကိုယ့် Webiste ရဲ့ Login Form ကို အလွယ်တကူဖြည့်ကြည့်လို့ရနေပါတယ်။ အဲ့လိုမဖြစ်ရအောင် Login Url ချိန်းပေးတဲ့ Plugin ဖြစ်တဲ့ “WPS Hide Login” ကိုသုံးပေးလို့ရပါတယ်။
Change Username & Password
WordPress site တွေက username ယူလို့အရမ်းလွယ်ပါတယ်။ အဲ့တာကြောင့် Username မသိအောင်လုပ်ရမဲ့ နည်းတွေထဲကတစ်ခုတော့ Username နဲ့ Password ပြောင်းဖို့ပါပဲ။ Add New User နဲ့ အကောင့်သစ်တစ်ခု ဆောက်ရမှာပါ။
- တခြားသူတွေ ခန့်မှန်းလို့မရမဲ့ နာမည် (eg. aepgbe )
- Username နဲ့ First Name ကိုမတူအောင်ထားပါ
- သုံးနေကြမဟုတ်တဲ့ Password
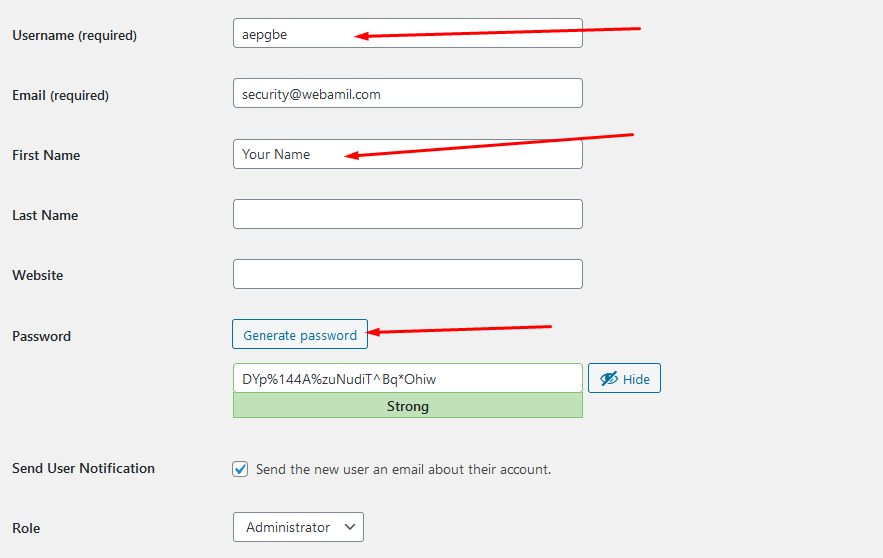
Username က ကျနော်တို့ website ကို login ဝင်တဲ့ နေရာမှာသုံးရမှာပါ။ အဲ့တာကြေင့် ခက်ခဲပြီး နားမလည်နိုင်တဲ့ စာလုံးတွေပေးသင့်တာပါ။ First Name ကကြတော့ Visitor ဘက်က မြင်ရတဲ့ နာမည်ပါ။ အဲ့တာကြောင့် သူတို့နားလည်နိုင်လောက်တဲ့ နာမည်တွေသုံးသင့်ပါတယ် ( Website Name ဖြစ်ဖြစ် အသုံးပြုသူရဲ့ နာမည်ဖြစ်ဖြစ်သုံးလို့ရပါတယ်) ။
Password မှာတော့ Generate Password ကိုသုံးစေချင်ပါတယ်။ ကျနော်တို့ အသုံးပြုနေကြ password တွေက Hack ဖို့လွယ်ကူပါတယ်။
အပေါ်က ကျနော်ပြခဲ့တဲ့ အချက်တွေအတိုင် Administrator Role နဲ့အကောင့်တစ်ခုဆောက်လိုက်ပါ။ ပြီးရင် အရင်ကအသုံးပြုခဲ့တဲ့ Administrator Role နဲ့ အကောင့်ဟောင်းကိုဖျက်ပျစ်ရမှာပါ။ အဲ့လိုဖျက်ပစ်ဖို့ဆိုရင် အခုလက်ရှိ Login ဝင်ထားတာက အကောင့်ဟောင်းဆိုရင် Logout ထွက်ပြီး အကောင့်အသစ်ကို Login ပြန်ဝင်လိုက်ပါ အဲ့တာမှ အကောင့်ဟောင်းကို ဖျက်ဖို့ Permission ရမှာပါ။
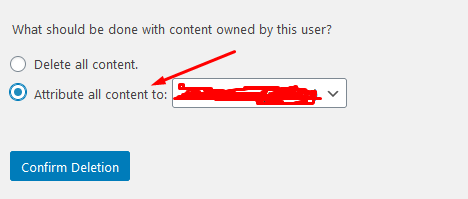
အကောင့်ဟောင်းကို ဖျက်တဲ့အခါ အပေါ်ကပုံလို့ Option နဲ့ရွေးခိုင်းပါလိမ့်မယ်။ Delete all content ဆိုရင် အကောင့်ဟောင်းနဲ့ လုပ်ခဲ့တဲ့ Post တေ Page တွေပါဖျက်ပစ်သွားမှာပါ။ အဲ့တာကြောင့် Attribute all content to ဆိုတာမှာ အကောင့်သစ်ကို ရွေးပေးရပါမယ်၊ အဲ့တာမှ အကောင့်ဟောင်းနဲ့ တင်ခဲ့သမျှတွေကို အကောင့်အသစ် နာမည်နဲ့ change ပေးသွားမှာပါ။
Delete Inactive Accounts
အသုံမပြုပဲဖွင့်ထားမိတဲ့ အကောင့်တွေရှိရင်လဲ ဖျက်ပစ်သင့်ပါတယ်။ တစ်ချို့အကောင့်တွေက Theme ထည့်လိုက်ပြီး Demo data တွေထည့်လိုက်လို့ပါလာတာတွေရှိတက်ပါတယ်။ အဲ့အကောင့်တွေကို စစ်ပြီး မလိုအပ်ရင်ဖျက်ပစ်ရပါမယ်။
Insert Code in Function.php
yourwebsite/wp-includes/
ဒီ file လမ်းကြောင်းမှာ function.php ဆိုတဲ့ File ရှိပါတယ်။ function.php ကို note pad နဲ့ဖွင့်ပြီး ထည့်လို့ရသလို့ WordPress Plugin သုံးပြီးထည့်လည်းရပါတယ်။ Code Snippets Plugin ကိုသုံးပြီး code တွေကိုထည့်လို့ရပါတယ်။
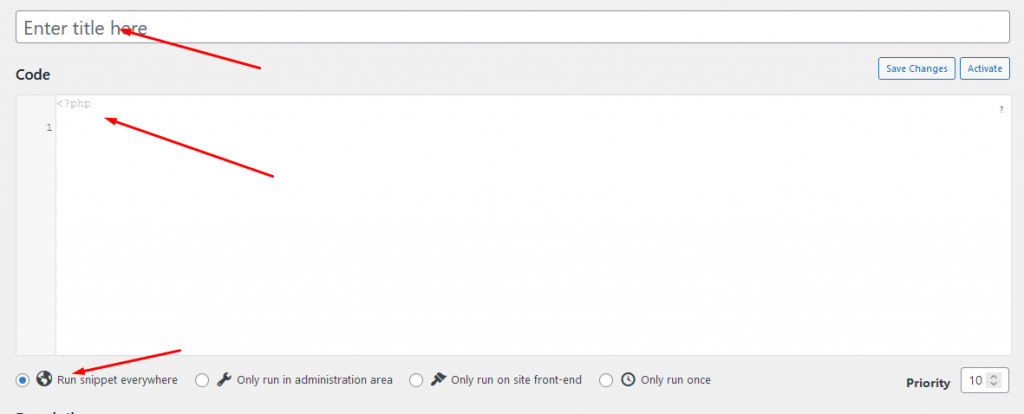
Save ပြီးတာနဲ့ Activate လုပ်ဖို့တော့မမေ့ပါနဲ့။ ထည့်ရမဲ့ Code တွေကိုပြောပြပေးသွားပါမယ်။
Remove WP Generator META tag
remove_action( 'wp_head', 'wp_generator' );
remove_action( 'opml_head', 'the_generator' );
Hide Author Usernames
add_action(‘template_redirect’, ‘bwp_template_redirect’);
function bwp_template_redirect()
{
if (is_author())
{
wp_redirect( home_url() ); exit;
}
}
Remove Unwanted Headers
add_action('init', 'shift8_security_init', 1);
function shift8_security_init() {
 header_remove('X-Powered-By');
 header_remove('X-Pingback');
}
Disable Your WordPress RSS Feed
add_action('do_feed', 'shift8_security_disable_feed', 1);
add_action('do_feed_rdf', 'shift8_security_disable_feed', 1);
add_action('do_feed_rss', 'shift8_security_disable_feed', 1);
add_action('do_feed_rss2', 'shift8_security_disable_feed', 1);
add_action('do_feed_atom', 'shift8_security_disable_feed', 1);
add_action('do_feed_rss2_comments', 'shift8_security_disable_feed', 1);
add_action('do_feed_atom_comments', 'shift8_security_disable_feed', 1);
add_filter('the_generator','shift8_security_remove_wp_version_rss');
function shift8_security_remove_wp_version_rss() {
 return '';
}
function shift8_security_disable_feed() {
 wp_die( __( 'No feed available, please visit the homepage!' ) );
}
Disable WordPress Emoji’s
remove_action( 'wp_head', 'print_emoji_detection_script', 7 );
remove_action( 'admin_print_scripts', 'print_emoji_detection_script' );
remove_action( 'wp_print_styles', 'print_emoji_styles' );
remove_action( 'admin_print_styles', 'print_emoji_styles' );
remove_filter( 'the_content_feed', 'wp_staticize_emoji' );
remove_filter( 'comment_text_rss', 'wp_staticize_emoji' );
remove_filter( 'wp_mail', 'wp_staticize_emoji_for_email' );
add_filter( 'tiny_mce_plugins', 'disable_emojis_tinymce' );
Remove Version Query Parameters From All Enqueued CSS And JS Files
add_filter( 'style_loader_src', 'shift8_security_remove_wp_ver_css_js', 10, 2);
add_filter( 'script_loader_src', 'shift8_security_remove_wp_ver_css_js', 10, 2);
function shift8_security_remove_wp_ver_css_js( $src ) {
 if ( strpos( $src, 'ver=' . get_bloginfo( 'version' ) ) )
 $src = remove_query_arg( 'ver', $src );
 return $src;
}
Insert Code in .htaccess
Website ရဲ့ Main Folder မှာ .htaccess ဆိုတဲ့ file ရှိပါတယ်။ အဲ့တာကိုတော့ note pad နဲ့ဖြစ်ဖြစ် Code editor တစ်ခုခုနဲ့ ဖွင့်ပြီး ထည့်ပေးရပါမယ်။
Options -Indexes
အပေါ်က code က ( /wp-includes ), ( /wp-content ) လို Folder တွေထဲကို Visitor တွေအနေနဲ့ ဝင်လို့မရအောင် ပိတ်ပေးတာပါ။
Insert Code in Config.php
Website ရဲ့ Main Folder မှာ config.php ဆိုတဲ့ file ရှိပါတယ်။ အဲ့တာကိုတော့ note pad နဲ့ဖြစ်ဖြစ် Code editor တစ်ခုခုနဲ့ ဖွင့်ပြီး ထည့်ပေးရပါမယ်။
define('DISALLOW_FILE_EDIT', true);
အပေါ်က code က Plugin တွေ Theme တွေကို Dashboard ဘက်က ပြင်ဆင်လို့မရအောင် လုပ်ပေးပါတယ်။
Code ထည့်ပြီးပြီ ဆိုရင် Plugin Editor ဆိုတာမပေါ်နေတော့ပါဘူး။
Close Comment
Post တွေမှာ comment system မလိုအပ်ရင်တော့ ပိတ်ပစ်သင့်ပါတယ်။ Comment တွေကလဲ Span တွေ အများ ဆုံးရောက်လာနိုင်လို့ပါ။

အပေါ်ကပြထားတဲ့ ပုံလို Quick Edit နဲ့လည်း Comment ကိုပိတ်လို့ရပါတယ်။
Other Useful Plugins
- Wordfence Security
- WP super Minify
- Advanced noCaptcha & invisible Captcha
- UpdraftPlus WordPress Backup Plugin
- Edit Author Slug
Login Limit တွေ နဲ့ DDOS Attack တွေလို ကိစ္စတွေအတွက် လိုအပ်တဲ့ Plugin လေးတွေပါ။
Wordfence Security
Plugin စထည့်ပြီးပြီးချင်ဆိုရင် Email တစ်ခုနဲ့ Subscribe လုပ်ပေးပြီးမှ သုံးလို့ရပါတယ်။ Brute Force Protection အတွက် Login Limit တွေပေးလို့ရပါတယ်။ Rate Limiting ထဲဝင်ပြီး DDos Attack ကိုကာကွယ်ဖို့အတွက် Limit တွေပေးထားလို့ရတယ်။ Two Factor လို Feature တွေလဲ ပါဝင်ပါသေးတယ်။
WP super Minify
Js, Css တွေကိုပါ Minify လုပ်ပေးရုံတင်မဟုတ်ပါဘူး Html code တွေကိုပါ ဖက်ရခက်ခဲအောင် Minify လုပ်ပေးပါသေးတယ်။
Advanced noCaptcha & invisible Captcha
Google Recaptcha ထည့်ဖို့အတွက် တော်တော် အဆင်ပြေတဲ့ Plugin ပါ။ Login Form, Comment Form, Contact Form 7, Order Form, Register လို Form တွေမှာ Google Recaptcha ကိုအလွယ်တကူထည့်လို့ရပါတယ်။
UpdraftPlus
Site ကို Backup ယူဖို့အတွက် အသုံးပြုသင့်တဲ့ Plugin ပါ။ Core File တွေရော Database ပါအလွယ်တကူ Backup ယူလို့ရပါတယ်။ တစ်လတစ်ခု တစ်ပတ်တစ်ခါ ဆိုပြီးတော့လဲ Backup အချိန်ကို Automatic ပေးထားလို့ရပါသေးတယ်။ နောက်ထက် အရေးကြီးဆုံးကတော့ အခြား Thard Party Storage တွေနဲ့ ချိတ်သုံးလို့ရတာပါ။ Google Drive နဲ့ချိတ်ထားပြီး တစ်ပတ်တစ်ခါ Core File ရော Database ပါ Backup ယူနေပါလို့ ပြောထားလို့ရပါတယ်။
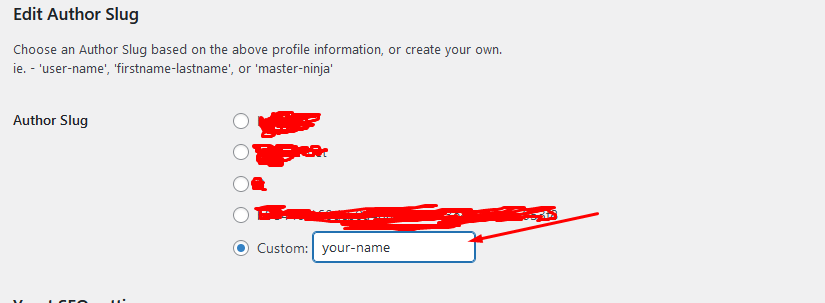
Edit Author Slug
ဒီ Plugin လေးက Website တိုင်းအတွက်လိုအပ်တာတော့မဟုတ်ပါဘူး၊ Multi Author လို Blog တွေတင်တဲ့ Website မျိုးတွေအတွက် လိုအပ်ပါတယ်။ အဓိက ရည်ရွယ်ချက်ကတော့ Visitor တွေက Post ရေးတဲ့လူရဲ့ url ကိုဝင်ကြည့်တဲ့အခါ Username ကြီးပေါ်နေတာကို ပြောင်းပေတာပါ။ အပေါ်က Change Username & Password မှာပြောခဲ့သလို့ ကျနော်တို့ ပြောင်းထားတဲ့ Username က သူများလွယ်လွယ်မသိနိုင်တဲ့ (eg. aepgbe ) လိုနာမည်တွေဆိုပေမဲ့ Plugin မထည့်ထားရင် ( https://yourdomain.com/author/aepgbe ) ဆိုပြီးပေါနေမှာဆိုတော့ Hack မဲ့သူတွေ Username ကို အလွယ်တကူသိသွားနိုင်ပါတယ်။ အဲ့တော့ Plugin လေးထည့်ပြီး edit user မှာပြင်လို့ရပါတယ်။
Change PHP Version
သင့် Website ရဲ့ PHP Version ကလဲ Up to Date ဖြစ်နေဖို့လိုအပ်ပါတယ်။
အပေါ်က အချက်လေးတွေအတိုင်း ပြင်ဆင်ပြီးရင်တော့ သင့် Website ကတော်တော်လေး လုံခြုံနေပါပြီ။
အဆုံးထိဖက်ပေးတဲ့အတွက် ကျေးဇူးပါ။ ဒီ Post လေးကိုဖက်ပြီး ဗဟုသုတ ရရှိတယ်ဆို Share လေးနဲ့ ကူညီပေးနိုင်ပါတယ်။
ပျော်ရွှင်စရာနေ့ရက်လေး ဖြစ်ပါစေ။